
How to Track your Time Effectively?
Are you in search of a no-cost time tracking tool to streamline your daily tasks? If so, your quest concludes here.
This Toggl Track guide elucidates the utilization of Toggl Track and the monitoring of time spent on various activities. By employing this free time tracking solution for small enterprises, you can determine the precise duration required for executing specific tasks and engagements.
You can seamlessly collaborate with up to five users without any expenses.
Furthermore, you have the option to integrate Toggl Track with your organization's project management software.
Let's jump into the platform!
Step #1: Sign up on Toggl
Toggl Track is accessible as an application (compatible with iOS and Android) and a Chrome extension. However, for this tutorial, we will utilize the free web version of Toggl Track. To commence using this no-cost time tracking software:
Input your email address and create a robust password
Click the "Sign up with email" button located beneath the password field

You also have the option to sign up using your Google or Apple account.
Now, let's proceed to your Toggl Track account.
Step #2: Handle your Account Settings
Before we go deeper into Toggl Time Tracking software, let’s set up your profile. In the free version of Toggle, there is no a huge variety of options you can set up, however there are still some useful Integrations you can make.
For instance, you can link your Toogl account to your Google Calendar.


Or even you can add a Toggl extension to your browser, where you can instantly type which project you will work on and the Timer starts immediately counting without going to your Toggl account.

Also, you can link Toggl Track with other essential tools (such as Asana project management) used in daily project and task management. With this match, you can use Toggl Track to monitor your time entries for specific projects and tasks within Asana.

See here below, how it works. I’ve already synchronized my Asana projects in my Toggl account. Asana projects appear in Blue, while Toggl projects are marked with Yellow on the “Projects” tab.

If you upgrade for the Starter pack, you’ll be able to set up some Billable rates in your Settings.
What are the Billable rates? They are associated with the duration of time entries, enabling you to view the billable amount for each specific task, for each client or member you’ve previously added to your projects.

Under the "Subscription" menu on the left bottom, you can view the 30-day trial of the premium plan and upgrade the plan if you wish. Simply add your payment details to begin. By doing so, you'll be able to access all the premium features offered by this free time tracking software.

Step #3: Establish a Toggl Track Workspace
On the left-hand side of the screen, you'll find the "Organization" button that will lead you to your workspace(s), the list of the members accessible to your projects, etc.
In the Free plan, you can have one Organization with one Workspace. Although, the system lets you create a second Organization, but in the end, it will suggest you to upgrade your plan to continue with the second funnel, so finally the second workspace won't work.
Consider the workspace as the hub of your organization. Each workspace contains teams, clients, and projects. For most small businesses, a single workspace suffices. Therefore, you can stick with the default workspace for the duration of this Toggl Track tutorial.

In the Free plan, you can only adjust your Organization's and Workspace's name or leave the Organization that I don't recommend to do, otherwise you'll loose your workspace with all the projects within that you cannot bring back anymore.

Step #4: Start Tracking your Project Time
Search for the timer on the navigation menu, which is present by default. Now, let's explore how to utilize Toggl Track for optimizing your time management.
Imagine you're engaged in writing an article on you Blog. Let's see how you can track this project.

Navigate to the "What are you working on?" field
Input "Blogpost creation" (or any activity you wish to monitor)
Click "Create a project" to add the activity to a project
After creating this new project, you can check it in your "Projects" menu where you'll also see that the Timer is on, which means that you are now working in this specific project.

By following these steps, you can effectively track your Blog content creation task using Toggl Track.
Step #5: Create your Project
After selecting "Create a project", proceed with the following steps:

Enter the project name as "Blogpost creation"' in the "Name" field
Choose the appropriate workspace from the dropdown menu
To add a client, click on "Add new client". For this Toggl Track tutorial, we will select Client A
Ensure to set your project as private next to the "Privacy" section. Keeping it private restricts access to only project members
Once all the necessary details are added, click on the 'Create project' button to finalize the setup


Step #6: Adding Tags (and Billables)
Now that our new "Blogpost creation" project has been successfully created, we can add some tasks or tags to the project. To do so, you have to go to the Timer on the upper left-hand side of the navigation menu, then type a task you'll work on, here you'll see a task named "Toggl walk around". Then, you can choose the project where this task has to be linked to, and you can also choose an already existing tag or create new tag for this specific task.


Adjacent to tags, you will find the "Billable" option. If this feature is enabled, the activity is billable. This means that if creating this blogpost takes 3 hours, you can generate a report, send it to your client, and bill them for your time.
However, to access this paid feature, you will need to upgrade to the Starter plan, at least.
Step #7: Start and Resume Time Tracking
When you are prepared to begin tracking, click on "Start time entry" in the upper-right corner. Once you have completed the task, you can click on the stop button to stop tracking.
On your screen, you will see a summary of your time entry.


By following the same process, you can add another activity for this project and client. For this Toggl Track tutorial, let's add "Mindmap creation".
Now, in addition to the time taken to complete each activity, you can see the total time for both entries. Also, notice the start and end times.
You can also filter on Clients, or the status of the Entries, whether you want to see active or already archived entries.

If you'd like to continue working on a particular activity, simply find the time entry in the "List view" mode and click the play icon next to it. The tracking will start again. To stop tracking, click the stop button.
Upon doing so, you will notice the grouped entries for this specific activity.

Step #8: Discover more Features
For each activity, there are additional options available. To access them, select an entry and click the three vertical dots in the far-right corner.
Here are the options you'll find in the free plan:
Duplicate
Go to project
Copy description
Copy start link
Delete

When you click on 'Manual Mode' (located in the upper-right space), you can manually add a time entry for a specific activity. To switch back to timer mode, click the clock icon.

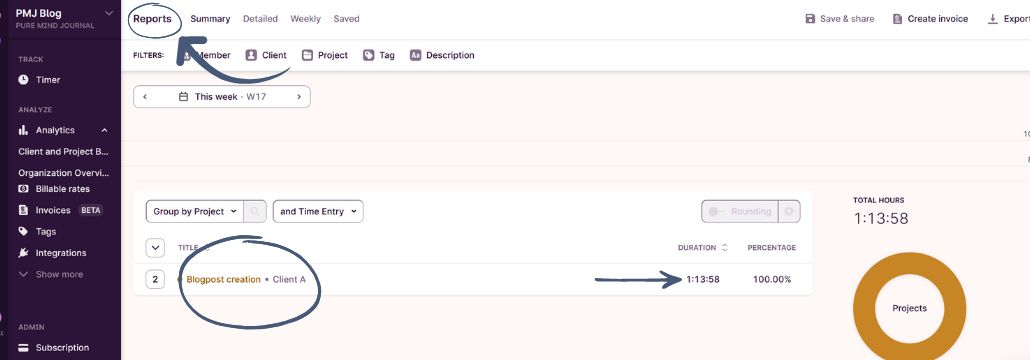
Step #9: Review your Performance Metrics
Under Step #7, we already saw some reports of our activities, but there are more data found under the "Insights" button of the navigation menu. For instance, you can view insights and trends related to your projects, clients, and team.
This feature allows you to analyze how your time is being spent, enabling you to optimize time allocation, reduce costs, and more.
However, this feature is only accessible in Upgraded plans.
Conclusion
Toggl Time Tracker software offers numerous advantages for businesses and entrepreneurs. It provides real-time visibility into projects, surfaces key operational metrics, and enhances efficiency, productivity, and profitability.
Entrepreneurs can benefit from Toggl by gaining control over project outcomes, understanding how time is spent, optimizing time allocation, reducing costs, and making data-driven decisions.
The software allows for accurate time tracking, project management, automated reporting, and budget management, catering to the diverse needs of entrepreneurs across various industries.


Trending Posts
How to Conquer Time Management Challenges
A Guide to Using the Eisenhower Matrix
The Key Areas of an Entrepreneurial Mindset
About us

Hey there 👋 We are Emese and Csilla, two business owners fascinated for tips and tools dedicated to increase efficiency in your online business.
Bring the most out of your business
Sign up for exclusive content, e-mails and tips we don't share with anyone.
Disclaimer: This Blog may contain affiliate links. If you choose to click through and make a purchase, we may receive a small commission at absolutely no extra cost to you. This only serves to cover the maintenance fees of the Blog itself. Please, be reassured that we recommend only products that we use and absolutely love!
© 2024 Pure Mind Journal